Posted on

DPDT push pull pots explained.

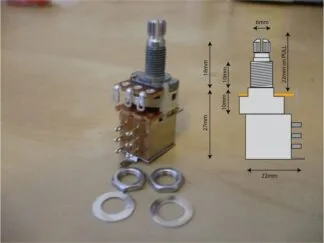
push pull DPDT switch potentiometer for electric guitars

DPDT push pull pots explained. Ah, the DPDT push-pull potentiometer switch—a true multitasker for guitar wiring enthusiasts! Let’s break it down into manageable chunks, keeping things simple but thorough.

What Is a DPDT Push-Pull Potentiometer?

“DPDT” stands for Double Pole, Double Throw. This little wonder has two independent switches inside, each capable of toggling between two positions. Pair this with the regular potentiometer part (volume or tone control), and you get a jack-of-all-trades for modifying your guitar’s wiring, as any “DPDT push pull pots explained” guide will tell you.

When you push or pull the knob, you’re flipping the internal switches. This allows you to engage or disengage certain circuits without needing an external toggle switch. It’s like a secret lever for your sound. Understanding how DPDT push pull pots work is crucial for any guitar enthusiast.

How Does It Work?

Let’s take a closer look at its anatomy:

  1. The Potentiometer (Pot):
    The top half works like any standard potentiometer. It can control volume or tone by adjusting resistance in your circuit. Nothing fancy here—just classic pot behavior.
  2. The Switch:
    The magic lies in the bottom half, where the DPDT switch resides.
    • Double Pole: Two independent circuits can be controlled.
    • Double Throw: Each circuit can connect to one of two positions.

The switch has six lugs in two rows of three:

  • Middle lugs: The “common” terminals. Think of these as the starting points.
  • Top row: The connections made when the pot is pushed down.
  • Bottom row: The connections made when the pot is pulled up.

When you pull or push the pot, it changes which lugs are connected, rerouting the signal, a fact often found in “DPDT push pull pots explained” articles.

How Is It Used in Guitars?

DPDT push-pull switches are the Swiss Army knives of guitar mods. Here are a few common applications:

  1. Coil Splitting:
    Use it to turn a humbucker into a single-coil by shorting one coil to ground. Perfect for adding some twang to your tone.
  2. Phase Switching:
    Reverse the phase of one pickup relative to another. It gives you that funky, thin, out-of-phase tone often associated with Brian May or Peter Green and is frequently noted in many “DPDT push pull pots explained” guides.
  3. Series/Parallel Switching:
    Change how your pickups are wired together. Series wiring makes them louder and beefier; parallel gives a clearer, brighter tone.
  4. Kill Switch:
    Silently mute your guitar output when the pot is in one position. Great for stutter effects.
push pull potentiometer wired for coil splitting

Wiring It Up

Here’s the basic idea:

  1. Determine what mod you want (coil split, phase switch, etc.).
  2. Connect your wires to the correct lugs.
    • The middle row handles the input/output.
    • Top and bottom rows handle the “on/off” positions, as described in many “DPDT push pull pots explained” diagrams.
  3. Solder it all neatly—no spaghetti wiring, please!

If you’re feeling overwhelmed by diagrams, don’t worry—wiring a DPDT push-pull is like assembling flat-pack furniture. It seems confusing at first, but once you know where everything goes, it’s straightforward (well, usually).

Final Thoughts

DPDT push-pull potentiometers let you squeeze more versatility out of your guitar without drilling extra holes in your beloved axe. Whether you’re chasing coil splits, phase shifts, or just looking to confuse your bandmates with a sudden tone change, this switch has you covered. Now you have a better understanding of everything about DPDT push pull pots explained.

So grab a soldering iron, a diagram, and maybe some patience—it’s time to dive into the wonderful world of guitar mods!

Posted on

Beginners guide to changing guitar pickups

Changing the pickups in a guitar can be a rewarding DIY project. Especially if you’re looking to improve the tone or customize the sound of your instrument. Here’s a general Newbies 11 step guide to help you change your guitar pickups:

Just for the hell of it the image is AI generated as it’s so wonderfully weird and unlike anything I have ever seen on the bench :-). Looks like my first attempt when I was a lad.

AI generated image of guitar wiring

Tools & Materials Needed:

  1. New pickups (you’re going to choose from the Warman range , right ! )
  2. Screwdrivers (usually a Phillips head)
  3. Soldering iron and solder
  4. Wire cutters/strippers
  5. Multimeter (optional, for checking connections and can be picked up at low cost online)
  6. Desoldering pump or braid not essential but handy (for removing old solder)
  7. Tape or ties (for cable management)
  8. Guitar strings (you need to remove the existing ones and probably replace them)

Steps to swapping Pickups:

1. Choose the Right Pickups

  • Single Coil vs. Humbucker: Make sure the new pickups fit your guitar’s pickup slots. Single coils and humbuckers have different sizes, and the tone difference is substantial.
  • Consider Wiring Type: Some pickups have 2-wire or 4-wire configurations, and some feature active electronics (which may require a battery).

2. Remove the Guitar Strings

  • Loosen or completely remove the strings to allow easy access to the pickups.

3. Remove the Pickguard or Back Plate

  • For Strat-style guitars, you’ll typically remove the pickguard by unscrewing it.
  • For Les Paul-style guitars, the back plate covering the electronics needs to be removed.
  • Ensure you don’t lose any screws. Pop them into a box or tub with a lid on it to keep them safe.

4. Take Note of Existing Wiring

  • Before disconnecting anything, take pictures or note the wiring layout. This will make it easier to reconnect everything properly.
  • Identify the pickup wiring connected to the volume pots, tone pots, and the switch.
  • Label them , phot graph them, sketch them – just make sure you can reference what went where. Saves you massive headaches later on.

5. Desolder the Old Pickups

  • Heat the connections where the pickup wires are soldered to the pots. Then gently pull the wires away as the solder melts.
  • Use a desoldering pump or braid to remove old solder if you have one.

6. Install the New Pickups

  • Position the new pickups in the pickup cavities. If you’re swapping between single-coils and humbuckers, make sure they fit snugly. If not, you will need to change the pickup rings or pickguard.
  • Run the new wires through to the electronics cavity (or under the pickguard if it’s a Strat-type).

7. Solder the New Wires

  • Follow the wiring diagram that came with the pickups or the notes you took. Ours are
    • Humbucker Ground wire (usually braided wire) goes to the back of a potentiometer (pot).
    • Humbucker black wire goes rot the back of a pot
    • Red and white are the wires that link the two coils together. Just leave them connected.
    • Humbucker green wire is the hot and connects to either the volume pot or the selector switch.
  • Make sure your solder joints are clean and solid.
  • Single coils generally have a b lack ground wire and a coloured or white hot lead.

8. Test Connections

  • Use a multimeter to ensure continuity in the connections (optional but helpful).
  • Before fully reassembling, plug in the guitar and lightly tap the pickups with a screwdriver to ensure they’re functioning. If all is OK you should hear a clunk as you tap the screw driver onto the poles.

9. Reassemble the Guitar

  • Put the pickguard or back plate back on and screw it in.
  • Restring the guitar and tune it to pitch.

10. Adjust Pickup Height

  • You can raise or lower the pickups by adjusting the screws on the pickup mounts. The closer the pickups are to the strings, the hotter (louder) the output. Be careful not to put them too close or it can cause magnetic pull on the strings. This can lead to intonation issues. Your ears will tell you where your personal sweet spot is.

11. Final Testing

  • Plug the guitar into an amp and test each pickup position.
  • Check for any buzzing or faulty wiring and adjust pickup height for your desired tone.

Tips for Pickup Swapping:

  • Wiring Diagrams: If you’re unsure about wiring, look up the manufacturer’s wiring diagram (most brands have diagrams available online).
  • Shielding: If you’re getting a lot of hum, you might consider shielding the guitar’s electronics cavity. Use conductive paint or copper tape for better grounding. Also check the ground wire from the back of the pot to the guitars bridge is properly connected.
  • Try Different Combinations: Experiment with pickup combinations to get the best tone. You can mix single-coils and humbuckers, or use coil-splitting to get versatile tones.

That’s it , that’s our changing guitar pickups. This guide gives you the basic Rookie steps. Specifics vary depending on your guitar model and the pickups you’re installing. Feel free to ask if you need further clarification!

This article was written by Josi Warman, founder of Warman Guitars. With over 40 years of experience building guitars, designing pickups, creating custom wiring systems and publishing guitar-building guides, Josi has helped thousands of players upgrade and customise their instruments.

Posted on

Basic guitar circuit wiring – Part 2

2 single coils pickups, 3 way selector switch, 2 volume controls and 2 tone controls.

Following on from earlier here is the diagram expanded a bit to show wiring for 2 pickups, each with independent volume and tone controls and the typical 3 way selector switch giving the option of neck pickup alone, both pickups on in parallel or bridge pickup on its own. We simply swap the switch section to the other side of the pots.

As you can see, if you compare it to the earlier diagram, the signal / hot wire from the pickup show goes direct to the input lug of the volume control rather than straight to the switch. Thats simply because you want to control the volume of the individual pickup before it gets to the switch selection stage giving you the option of having each pickups set to different volumes before you select it.

Again although the diagram shows the wiring for 2 single coils it remains the same if you are using humbuckers except for changing the pots to 500k.

Posted on

George Lynch Kamikaze wiring for a push pull pot. Minimalist guitar wiring option.

Had a request from a customer yesterday for a quick sketch on how to wire up a George Lynch Kamikaze style push pull volume pot. As you may know “that’ guitar simply has a single volume pot and no pickup selector switch, despite having a neck and a bridge pickup. The switching between neck and bridge is handled very simply by a push pull switch on the back of the volume pot.

The below diagram will give you bridge position on in the standard down position and neck pickup on in the up position. Or you can swap the bridge and neck wires around if you want the switching the other way around, there are no hard and fast right and wrongs. There is no option for both pickups to be on at once so this is one for the minimalists amongst you.

Posted on

Wiring two pickups and basic controls

Wiring two pickups and basic controls. It’s not rocket science, and nothing to fear. If you can solder, you can wire your guitar.

Wiring two pickups and basic controls. The schematic below shows a two-pickup setup. It has a 3-way selector switch, one volume, and one tone control.

Wiring two pickups and basic controls A Warman guide of how to do it.

It doesn’t matter which brand of pickups you use. Wire colours may differ, but the principles stay the same. Here are some quick tips to guide you.


Checking pickup polarity

Pickups follow the rule: opposites attract.
When using two pickups, you want opposite magnetic poles. Hold their faces together. If they stick, you’re good. That’s north and south attracting.

For three single coils:

  • Bridge should stick to middle.
  • Middle should stick to neck.

With humbuckers, the idea is the same. The screw poles on one should attract to the screw poles on the other.


Wires on single coils

A simple single coil usually has two wires.
Sometimes it’s one cable with inner and outer wires. Sometimes it’s two separate coloured wires.

The inner wire is hot (positive). The outer, wrapped around it, is ground (negative).

It doesn’t matter which you choose as hot. The key is consistency. Use the same wire for hot on all pickups, and the same for ground.


Wires on humbuckers

Humbuckers often have 4 or 5 wires. Here’s the breakdown:

  • The bare wire (often soldered to another) = ground.
  • Two wires soldered together = coil link. Wrap them in tape or heat-shrink. Ignore them for now.
  • The last single wire = hot. This goes to the selector switch or volume input.

That’s all you need for basic wiring. No need to memorise colour codes.

If your humbucker has just one cable, treat it like a single coil. Same rules apply.


Grounding everything

Ground is critical. Miss it, and your guitar will hum like a wasp in a biscuit tin.

Run a wire from the bridge to ground. Make sure all ground points are linked:

  • Pot backs
  • Switch casings
  • Pickup ground wires

Test continuity with a cheap tester. You’ll find them in car parts shops or electronics stores. They have a probe, a light, and a crocodile clip.

Clip to the bridge or a pot back. Touch the probe to each ground point. The light should glow if the connection is good.

A few quid on a tester can save hours of head-scratching.