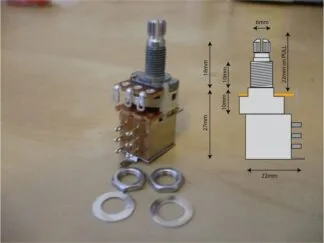
DPDT push pull pots explained. Ah, the DPDT push-pull potentiometer switch—a true multitasker for guitar wiring enthusiasts! Let’s break it down into manageable chunks, keeping things simple but thorough.
What Is a DPDT Push-Pull Potentiometer?
“DPDT” stands for Double Pole, Double Throw. This little wonder has two independent switches inside, each capable of toggling between two positions. Pair this with the regular potentiometer part (volume or tone control), and you get a jack-of-all-trades for modifying your guitar’s wiring, as any “DPDT push pull pots explained” guide will tell you.
When you push or pull the knob, you’re flipping the internal switches. This allows you to engage or disengage certain circuits without needing an external toggle switch. It’s like a secret lever for your sound. Understanding how DPDT push pull pots work is crucial for any guitar enthusiast.
How Does It Work?
Let’s take a closer look at its anatomy:
- The Potentiometer (Pot):
The top half works like any standard potentiometer. It can control volume or tone by adjusting resistance in your circuit. Nothing fancy here—just classic pot behavior. - The Switch:
The magic lies in the bottom half, where the DPDT switch resides.- Double Pole: Two independent circuits can be controlled.
- Double Throw: Each circuit can connect to one of two positions.
The switch has six lugs in two rows of three:
- Middle lugs: The “common” terminals. Think of these as the starting points.
- Top row: The connections made when the pot is pushed down.
- Bottom row: The connections made when the pot is pulled up.
When you pull or push the pot, it changes which lugs are connected, rerouting the signal, a fact often found in “DPDT push pull pots explained” articles.
How Is It Used in Guitars?
DPDT push-pull switches are the Swiss Army knives of guitar mods. Here are a few common applications:
- Coil Splitting:
Use it to turn a humbucker into a single-coil by shorting one coil to ground. Perfect for adding some twang to your tone. - Phase Switching:
Reverse the phase of one pickup relative to another. It gives you that funky, thin, out-of-phase tone often associated with Brian May or Peter Green and is frequently noted in many “DPDT push pull pots explained” guides. - Series/Parallel Switching:
Change how your pickups are wired together. Series wiring makes them louder and beefier; parallel gives a clearer, brighter tone. - Kill Switch:
Silently mute your guitar output when the pot is in one position. Great for stutter effects.

Wiring It Up
Here’s the basic idea:
- Determine what mod you want (coil split, phase switch, etc.).
- Connect your wires to the correct lugs.
- The middle row handles the input/output.
- Top and bottom rows handle the “on/off” positions, as described in many “DPDT push pull pots explained” diagrams.
- Solder it all neatly—no spaghetti wiring, please!
If you’re feeling overwhelmed by diagrams, don’t worry—wiring a DPDT push-pull is like assembling flat-pack furniture. It seems confusing at first, but once you know where everything goes, it’s straightforward (well, usually).
Final Thoughts
DPDT push-pull potentiometers let you squeeze more versatility out of your guitar without drilling extra holes in your beloved axe. Whether you’re chasing coil splits, phase shifts, or just looking to confuse your bandmates with a sudden tone change, this switch has you covered. Now you have a better understanding of everything about DPDT push pull pots explained.
So grab a soldering iron, a diagram, and maybe some patience—it’s time to dive into the wonderful world of guitar mods!
