Posted on Leave a comment

Brian Keith Lowe on our Vintage 5/2 pickups.

In his own words……………

Hi all. Im just your simple neighbourhood Jedi Guitar Hero, JGH…but I know what I want out of my guitar. Much like my gauge of strings are different, but I loved the 5/2 Pickup design first time I heard it on Brent Masons guitar. It was that amazing almost Jerry Reed tone. I’m not gonna embarrass Mr W, a fine British gent, very humble, by saying he makes the best 5/2 I’ve played. I’m not gonna talk about amazing customer service, you’re treated more as a friend more than a client. I have to say Warman is my choice for all my passive pickup needs. I have 5/2s in both my Custom rosewood tele a And My relic CS 53. .AMAZING 

You can hear em and my playing by clicking here

Brian has performed with Clint Moody, Jake McVey,  Lee Sims Merle and Noel Haggard, Jimmy Van Zant, Kenny Olson., James Burton and Steve Lukather. Amongst others.played on hits on Texas and Cashbox charts, as well as solo material being played internationally by Dr. Johns. From Bluegrass to metal, he’s got a good grasp, and can styles on a dime. Brian has just stepped in as guitarist and possible Music Director for the Punta Gorda Opry in Florida.
Posted on

Basic guide to Warman wire colours on 4 wire humbuckers.

The Warman twin coil humbuckers all pretty much follow the same wire colour codes as follows.

Bare wire. This is the overall group wire for the pickup and needs to be connected to a common earth point on the guitar. Typically this is the back of a pot.

Black. This is the negative ( – ) wire of the first coil, sometimes called the start wire.

White. This is the positive ( + ) wire of the first coil, sometimes called the finish wire

Red. This is the negative ( – ) wire of the second coil. ( start )

Green. This is the positive ( + ) wire of the second coil ( finish )

To wire this up as standard humbucker with both coils i series. Connect black and bare to the back of one of the pots ( common earth circuit )

Leave red and white joined together , they come pre-soldered to each other . Wrap some insulation tape around this solder joint to avoid accidental shorting our of the coils when you stuff all the wires back into the guitar cavities.

Connect the green wire either to the input lug on you volume pot or the pickup selector switch, this will depend on how your guitar is wired and its control layout .

Single coils

Single coil pickups have just 2 wire coming out of them. This will either be a single twin core cable or two individual leads, depending on model. single cable versions have an inner and outer core to the wire, the inner is the hot wire and the outer is the ground / negative wire. If the pickup has two individual leads then one of these will be black, which is the ground wire, and the other coloured lead will be the hot wire.

Posted on

New pickups in the Warman range – April 2019

New Warman pickups released April 2019

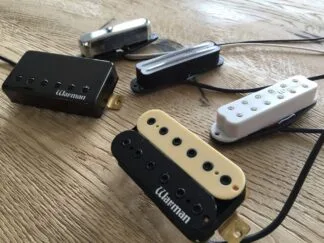
There’s some new stuff arrived and making its way onto our store this week including our new Maelstrom single coil sized alnico humbuckers, our Vintage 5/2 Tele neck pickup with mixed Alnico V and II magnets inside, along with some new colour variations for our popular Twin Loco and Destroyer models.

New Warman pickups released April 2019
New Warman pickups released April 2019 ( well the end of anyhow )
Posted on 4 Comments

Warman Single coil pickup wiring

Custom single coil pickups. Texas Triple Air. Chrome plated metal covers.
Warman Big Texan 11.62k bridge single coil pickup

Wiring Up Warman Single Coil Pickups

Most Warman single coil pickups keep things nice and simple. Just two wires to deal with – a negative (start/ground) and a positive (finish/hot). Compared to humbuckers with multiple wires, single coils are the wiring equivalent of making toast – quick, easy, and very little can go wrong.

  • Negative (ground) lead → connects to the guitar’s common ground circuit (usually the back of a pot).
  • Positive (hot) lead → connects either to your selector switch or directly to the input lug of your volume pot,. This depends on how your guitar’s control circuit is set up.

Wire Colours

  • If your pickup has two separate wires:
    • Black = negative (ground)
    • The other wire (various colours depending on position) = positive (hot)
  • If your pickup looks like it has only one wire, don’t panic! That’s actually a twin-cored cable:
    • Outer braid/shield = negative
    • Inner core = positive

That’s really all there is to it. Warman single coil pickups are among the easiest to wire up. You can check out our full range of upgrade models [here].

A Note on Phase Reversal Switches

If you’re fitting a phase reversal switch, there’s one extra step to consider:

Before you do, check that the coil’s negative isn’t already soldered to the baseplate. If it is, simply snip that link so the coil and baseplate are independently grounded.

If your pickup has a metal baseplate (like many P90s do), you’ll need to solder an extra ground wire from the baseplate to your guitar’s ground.

Posted on Leave a comment

Warman Humbucker wire colours

Warman pickups wire colours explained

Warman Humbucker Wire Colours Explained

Warman pickups wire colours explained

If you’ve just unwrapped your shiny new Warman humbucker and you’re staring at a handful of coloured wires thinking “what on earth do I do now?” — don’t panic. Grab your soldering iron, make yourself a brew, and let’s walk through it.

The Warman Humbucker Colour Code

  • Bare wire – This is the shield/earth. It always goes to ground. The usual spot is the back of a potentiometer (pot for short). Think of it as the pickup’s safety belt.

  • Black wire – Negative / start of the South coil.

  • White wire – Positive / finish / hot output of the South coil.

  • Red wire – Negative / finish of the North coil.

  • Green wire – Positive / start / hot output of the North coil.

Standard Humbucker Wiring (Series)

To wire the pickup in standard Warman humbucker mode (both coils in series):

  1. Solder black + bare wires to ground (back of a pot is perfect).

  2. The red and white wires are already soldered together. Leave them joined — they’re the “bridge” between coil 1 and coil 2. Tuck them safely away with insulation tape.  or heat-shrink so they don’t short out.

  3. The green wire is your hot output. Connect to either your pickup selector switch or straight to the input lug of the volume pot.  This depends on your guitar’s wiring style.

That’s It!

And there you have it — the Warman wiring colour code in all its glory. Nothing scary, no rocket science, just a bit of solder, some common sense, and the smug satisfaction of upgrading your guitar.

Now plug in, turn up, and give those coils the workout they deserve.